Poster Presenter Guidelines
Important Dates:
March 12: Watch for email from Alerts@ATIVsoftware.com with individualized poster upload instructions for app.
March 19, 8:00 p.m. EDT: Deadline to upload poster to app. This deadline applies to all poster authors. If you have also been assigned a “poster preview” (find your name on the author assignment page and see if the words “poster preview” are shown) please visit the poster preview page for more information.
March 19, 11:00 a.m.–4:00 p.m. EDT: Remo poster presentation practice session open
Overview
Uploading Virtual Poster files to the App
Upload PDF
Record poster audio
PDF preparation tips
Audio overview tips
Presenting in Live Poster Sessions
Test your system
Remo live test session
Log in to the Poster Hall/Remo
Find your table
Upload your poster to the Whiteboard
Remo presenter tips
Poster session schedule/floors
FAQs
Overview
Poster presentations at Dros21 will consist of two parts:
- Virtual Poster Files in the App: Poster PDFs with an optional 2-minute audio overview will be available to conference registrants via the app between March 22 and April 2. Presenters will upload their posters between March 12 and March 19. Attendees will be able to leave questions as comments on the poster entry in the app.
- Live Poster Sessions on Remo: Poster sessions will take place via the Remo video conferencing platform, which mimics an in-person poster event. Each presenter will be assigned their own “table,” which is a group video chat room with a “whiteboard” where presenters will upload their poster file to reference during the discussions. Each poster presenter will present in two different poster sessions.
Each poster presenter will need to do the following:
- Register for the conference by March 5. If you do not register by the deadline, you will not receive the poster upload link.
- Test your computer, browser, internet, and camera/microphone for compatibility with the live poster session platform. Test system now ≫
- Create a PDF poster file (single page) that is <10 MB in size.
- Practice giving a 2-minute audio overview of your poster.
- Between March 12 and March 19, upload the PDF file and record the audio overview as described below. You must use the Chrome web browser to record audio.
- On Friday, March 19, create a Remo account and explore the test session to practice navigating the system. You will receive information about the test session via email.
- Fifteen minutes before your assigned poster session, access your poster session via the Conference App, log into Remo, find your assigned floor and table, and upload your poster PDF (no audio overview) to your table’s whiteboard. Then the session will begin! It is important that you arrive at your table fifteen minutes in advance of your scheduled time so you do not lose your slot.
- Attendees who can’t make it to your poster session can also leave questions for you in the App, so be sure to check the “Discussion” section at the bottom of your poster entry in the App.
Uploading Virtual Poster files to the App
Presenters must upload a PDF version of their poster to the Conference App using the personalized link that will be sent via email from alerts@ATIVsoftware.com with the subject line “Invitation to Add Content to DROS21” on March 12. We suggest you add alerts@ATIVsoftware.com to your email contacts to ensure the message does not end up in your junk folder.
Poster materials will be made available to all conference registrants via the app between March 22 and April 1. Attendees can leave questions for you in the App, so be sure to check the “Discussion” section at the bottom of your poster entry in the App before April 2.
You can view a sample Virtual Poster in a test App to get a sense of how attendees will view your poster file. Read instructions for viewing sample Virtual Poster ≫
Poster upload invitation sent to presenters: March 12
Poster upload deadline: March 19, 8:00 p.m. EDT
File size limit: 10 MB
Browser requirement: Latest version of Google Chrome
Upload PDF
- Ensure you are using Chrome as your web browser.
- Click the “Portal Login” link in the email from alerts@ATIVsoftware.com.
- Log in to the portal using your registration badge number and last name. You can find your badge number in your conference registration confirmation email, which was sent from the address NoReply@Convention-Mail.com.
- Click on the blue plus sign next to “Virtual Poster” to upload your PDF.
- It may take a few minutes for the upload to complete, depending on your internet connection.
- You can now record audio, if desired.
- If you don’t want to include audio with your poster, simply click “Done” without recording.
Record poster audio
When you upload your poster PDF, you will have the option to record a 2-minute audio overview that attendees can listen to while they view your poster before the conference. Because the file is limited to two minutes in length, we recommend you practice your timing before you start recording. You must use the web browser Google Chrome for uploading your poster and recording audio.
- After you upload your PDF file, click the red microphone button to record your audio.
- When you’ve finished, click the stop button.
- You can replay the audio using the blue play icon or delete the file and start again using the trashcan icon.
- Press the “Done” button once you are happy with the recording.
PDF preparation tips
- Your PDF file must be smaller than 10 MB. For maximum accessibility by all attendees, we recommend making the file as small as possible.
- The poster will be displayed as a single page.
- Remember that people will be viewing the poster on a computer screen. To aid legibility, we recommend using large font sizes and a landscape page orientation. As a reference, many laptops have a screen aspect ratio of 16:9; so for example, this ratio would match a 36″ high by 64″ wide physical poster.
- Viewers will be able to zoom in to inspect any part of your poster, but there is no scroll function. For this reason, we do not recommend long, portrait-orientated posters.
- Divide the poster into discrete, well-labelled sections (large font size) to help people follow along while listening to the audio overview.
- You can read more tips on how to create virtual posters in this article from the app developers.
- You can view a sample virtual poster (PDF with audio) in a test App to get a sense of how attendees will view your poster file. Instructions for viewing sample virtual poster ≫
Audio overview tips
- You can’t describe every aspect of your poster in three minutes; you should instead provide an overview of key points and highlights that will encourage viewers to learn more by reading your poster or attending your live session.
- As you discuss different parts of your poster, refer to the sections using their titles, so that viewers can focus on the relevant part of your poster.
- Practice the timing to make sure you can cover your key points within the allowed two minutes.
- Speak slowly and clearly to ensure you are easily understood, including by attendees whose first language is not English.
- For best audio quality, use a headset or external microphone if possible.
↑ Back to Top
Presenting in Live Poster Sessions
Poster Sessions will take place using the Remo virtual platform. Remo provides a video discussion forum that mimics an in-person networking event. Group video chats take place at “tables” that accommodate up to eight people at once. Attendees can navigate the poster sessions via a floor plan that shows each table and the number of “seats” taken at the table. Presenters can display their poster to table attendees by uploading it to the table whiteboard. They will discuss their work with groups of attendees coming and going throughout the session, just like at an in-person meeting! Watch 3-min video introduction to Remo ≫

Test your system
Poster presenters must test their system for compatibility with the Remo platform at the test page below before the conference. Not all web browsers are supported. Make sure you are using the computer and browser that you plan to use during the live sessions.
Important note: you cannot access Remo from a tablet or iPad.
If your system fails the tests and you are not able to resolve the issue by using a different browser, please contact sbrown@genetics-gsa.org with your question.
Remo live test session
On Friday, March 19, you can access a Remo test session to get more familiar with logging in and navigating the platform. Remember that you must register your Remo account using the same email as your conference registration. The test session will be available to enter at any time between 11 a.m. and 4 p.m. EDT, and you can find the link on the “Live Poster Hall” page of the Conference App.
You can only log in to Remo on one device/browser. Remember to sign out when you have finished testing.
Log in to the Poster Hall/Remo
You will be able access the Poster Hall only during a scheduled poster session or the test session on March 19.
- Log in to the Conference App using your registration badge number and last name.
- Find your poster (you can search for your last name).
- Note the last letter of your program number. That is your poster session number. E.g. Poster 106A is in Poster Session A.
- Go to the “Live Poster Hall” link on the App homepage (also available via the “More” tab).
- Click the link corresponding to your Poster Session and the relevant day.
- Click “Join Event Now” on the Remo event welcome page.

- Register for Remo with exactly the same email address you used to register for the conference. Do not use the option to log in via Google. You will need to create a Remo password when you register.
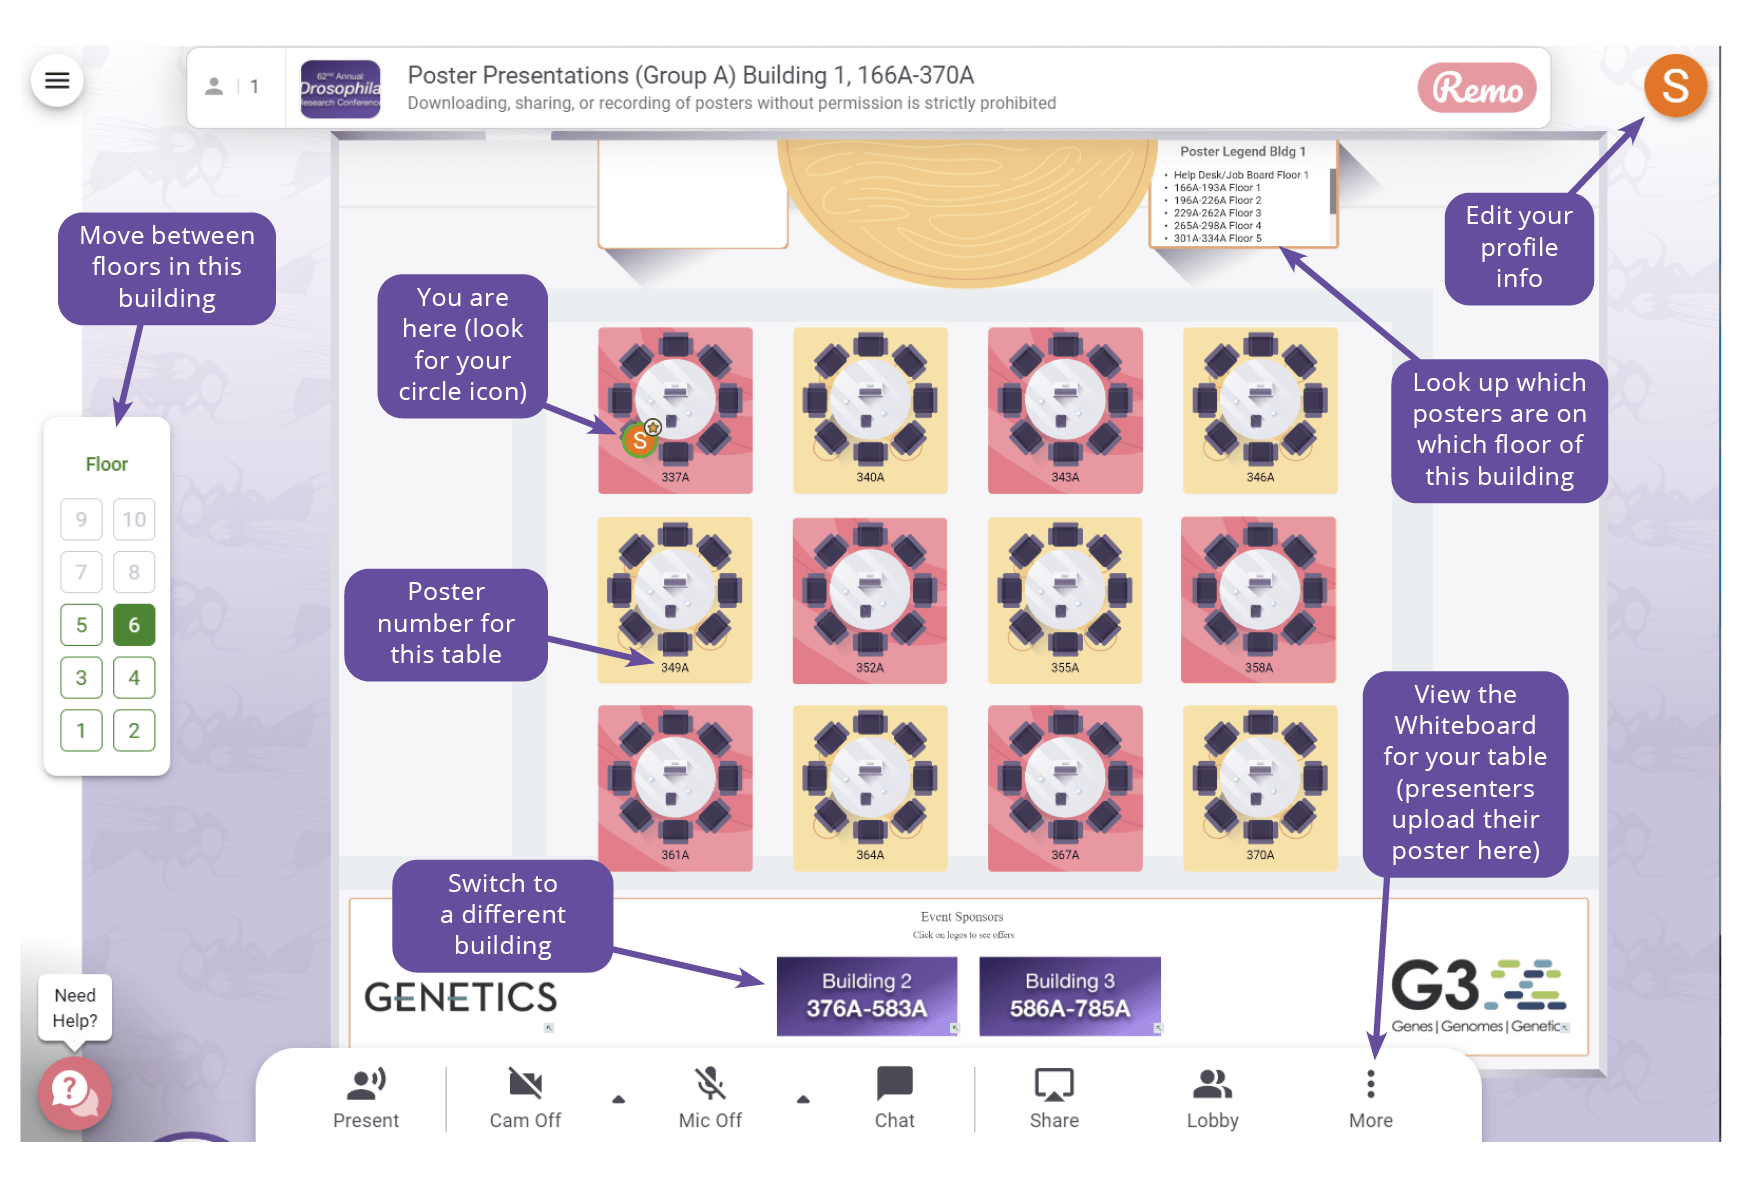
Find your table
Fifteen minutes before your assigned poster session starts, you should access the Poster Hall. When you enter, you will be assigned to a random table and must then navigate to your assigned table. Make sure you know your poster program number. It can be found on the Author Assignment page or in the Conference App (listed as “PgmNr”).
STEP-BY-STEP DETAILS:
- You will be assigned to a random table when you first enter the Poster Hall and must immediately navigate to your assigned poster table.
- Check the session listing on the top right of the screen to find which floor your poster program number is assigned to.
- Once you have found the table with your poster number, double click on the table.
- You are now seated at your poster table. You should see your circle icon (showing your photo or first initial) displayed on your chosen table. Turn on your microphone and camera and upload your poster to the Whiteboard.
Upload your poster to the Whiteboard
- Once you are at your assigned table, click the “Whiteboard” icon at the bottom of your screen.
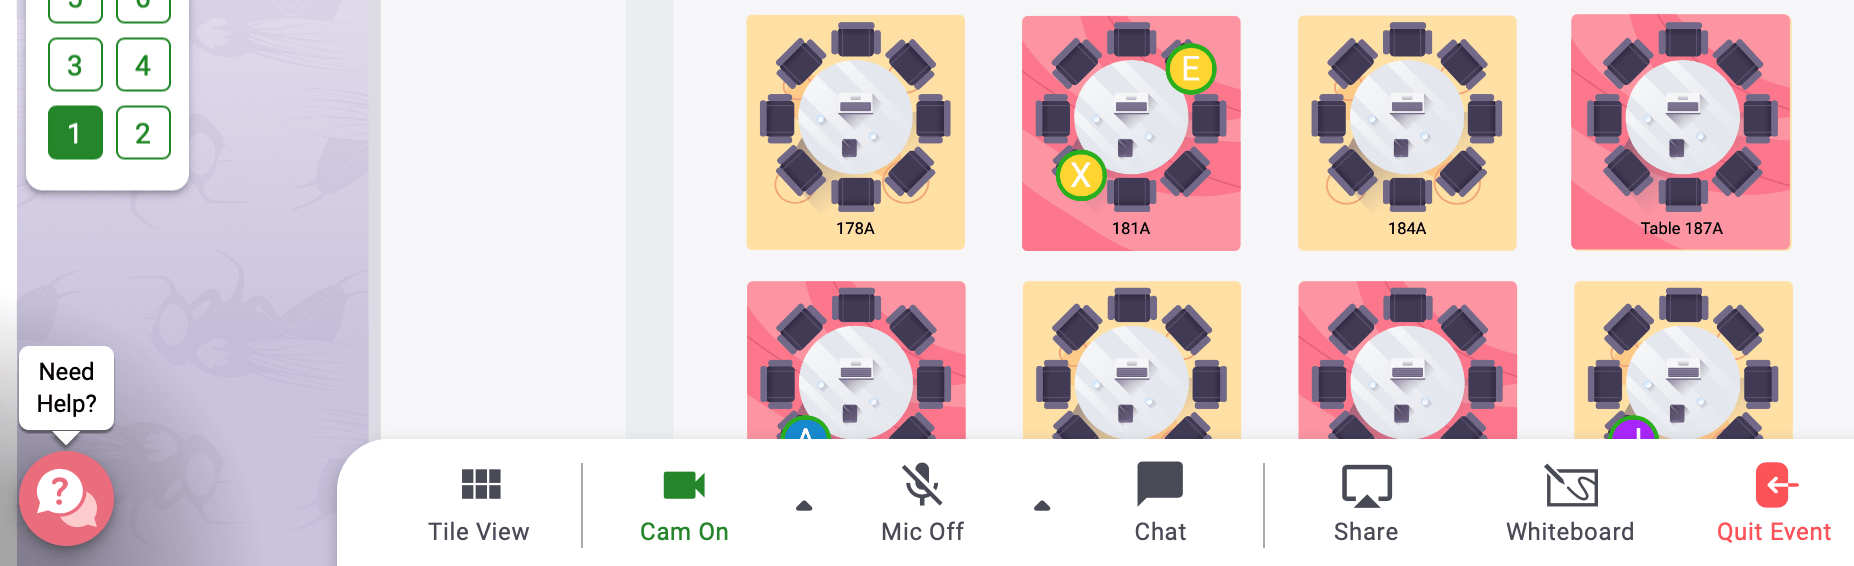
- Click the “three dots” icon at the bottom of the toolbar on the left-hand side and select “Upload” from the menu that pops up.
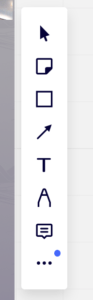
Once the file finishes uploading, the poster should now appear within the whiteboard. Zoom in to 150% to force the Whiteboard to render at the best resolution, then zoom out to your desired zoom level.
To remove a poster file from the whiteboard: make sure the “arrow” tool is selected in your whiteboard toolbar, then click the poster image and use your keyboard’s “Delete” button.
Remo presenter tips
- Test before you present. Make sure you have tested your browser, technology, and video sharing settings before the session. Test system now ≫
- Turn off all unneeded apps. This will improve the performance of Remo and the quality of your audio and video feed.
- Zoom in to 150% to improve resolution. If your poster looks blurry on the Whiteboard, zoom in to 150% using the controls in the lower right. Wait a few seconds for the Whiteboard to render and once the resolution looks better you can zoom back out.
- Try not to move the PDF around once you are giving your presentation When you move your poster within the Whiteboard, it will move for all the viewers. You can zoom in and out without affecting the display for viewers. The best strategy is to direct people where to look verbally and by pointing with your cursor.
- Want to share a link with your table’s visitors? Add it to the Table Chat. Select “Chat” at the bottom of the screen and then “Table Chat.”
Poster session schedule/floors
You will present your poster in two separate sessions based on the letter following your poster number assignment. So, for example if your poster number ends in “A”, you will be presenting on Tuesday, March 30 at 10:00 a.m.–12:00 p.m. and Wednesday, March 31 at 12:30 p.m.–2:30 p.m.
You can find your assigned floor using the Poster Table Finder page in the App.
↑ Back to Top